1.SDK配置
1.1 SDK初始化
第一步:导入sdk库
pod 'HETOpenSDK','2.0.2'
第二步:导入模组库
根据产品类型找到对应的芯片模组名称,如下:

【示例代码】
source 'https://github.com/C-Life/HETSDKSpecs.git'
source 'https://github.com/CocoaPods/Specs.git'

##支持真机调试和模拟器调试
# 汉枫-WiFi模组
pod 'HETPublicSDK_WiFiModule/HF_LPT100_V3','1.0.0'
# 乐鑫-WiFi模组
pod 'HETPublicSDK_WiFiModule/ESP8266','1.0.0'
# COOEE-WiFi模组
pod 'HETPublicSDK_WiFiModule/COOEE','1.0.0'
# MarvellV2-WiFi模组
pod 'HETPublicSDK_WiFiModule/Marvell_MW300_V2','1.0.0'

##支持真机调试
# TI-WiFi模组
pod 'HETPublicSDK_WiFiModule/TI_CC3200R2',     '1.0.0'
# 科中龙-WiFi模组
pod 'HETPublicSDK_WiFiModule/Realtek8711AF',     '1.0.0'
# 信驰达-WiFi模组
pod 'HETPublicSDK_WiFiModule/MTK7681',     '1.0.0'
# 信驰达-WiFi模组
pod 'HETPublicSDK_WiFiModule/MTK7687',     '1.0.0'
# 新力维-WiFi模组
pod 'HETPublicSDK_WiFiModule/NL6621',     '1.0.0'
第三步:注册配置
【示例代码】
- (BOOL)application:(UIApplication *)application didFinishLaunchingWithOptions:(NSDictionary *)launchOptions {
    // 1.SDK注册
    [HETOpenSDK registerAppId:@"yourAPPId" appSecret:@"yourAPPSecret"];
    // 2.配置网络环境
    [HETOpenSDK setNetWorkConfig:HETNetWorkConfigType_PE];
    // 3.设置SDK的日志信息开启
    [HETOpenSDK openLog:YES];


    // 4.H5设备公共包
    [HETH5Manager launch];
    return YES;
}
1.2 配置App主题信息
通过参数定义的JSON字符串来进行配置App主题色,demoApp是通过HETAuthorizeTheme.plist 这个文件来组装JSON字符串的,如图所示:
HETAuthorizeTheme *theme = [HETAuthorizeTheme new];
theme.navHeadlineContent = @"安全登录";           // 标题
theme.logoshow = YES;                           // logo显示
theme.weixinLogin = YES;                        // 微信登录显示
theme.qqLogin = NO;                            // QQ登录显示
theme.weiboLogin = NO;                         // 微博登录显示
theme.loginType =@"1";                         // 主题样式(1、2、3)
theme.navTitleColor = @"FFFFFFFF";              // 导航标题文字颜色
theme.loginBtnFontColor = @"FF3b96ff";          // 登录按钮文字颜色
theme.navBackgroundColor = @"FF3b96ff";         // 导航颜色
theme.navBackBtnType = @"white";                // 返回按钮
theme.loginBtnBackgroundColor = @"FFFFFFFF";    // 登录按钮颜色
theme.loginBtnBorderColor = @"FF3b96ff";        // 登录边框颜色
HETOpenSDK setAuthorizeTheme:theme];
注意:
颜色设置为
FF3b96ff,前面两个FF表示的是透明度,后面的3b96ff表示的是RGB颜色
1.3 集成注意事项
注意1:如果网络请求出现AppID不合法,请检查Xcode工程里面的BundleId和appId,必须跟在开放平台创建应用时填的BundleId和AppID保持一致。
注意2:目前只开放切换正式环境
2.用户模块
2.1 获取登录状态
【示例代码】
 HETAuthorize *auth = [[HETAuthorize alloc] init];
 [auth isAuthenticated];
2.2 C-Life 授权登录
【示例代码】
 HETAuthorize *auth = [[HETAuthorize alloc] init];
 if (![auth isAuthenticated]) {
     [auth authorizeWithCompleted:^(NSString *openId, NSError *error) {

     }];
  }
2.3 云云对接用户授权登录
为了适应第三方用户拥有独立账号系统后台的业务需求,同时也考虑平台的安全问题SDK也提供了云云对接用户授权验证接口,在这种环境下用户可以使用本身的登录系统,然后再利用云云对接的方式实现 一次性登录授权,下面是具体的接口调用流程:
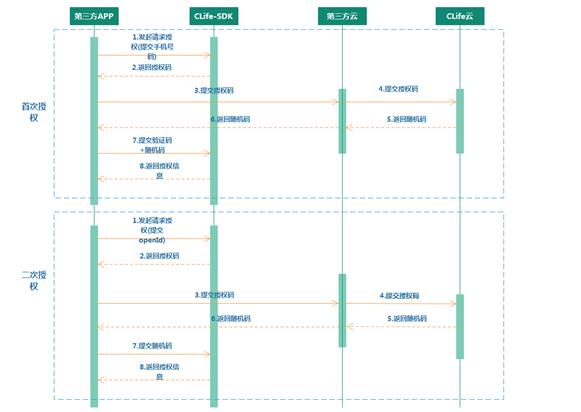
第一步:通过SDK获取授权码
【示例代码】
[[HETThirdCloudAuthorize shareInstance]getAuthorizationCodeWithAccount:_account withOpenId:self.openID  Completed:^(NSDictionary *responseDic, NSError *error) {
      NSLog(@"user info success: %@", responseDic);
      if(error){

      }else{
             if([responseDic isKindOfClass:[NSDictionary class]]){
                NSString * authorizationCode = [responseDic objectForKey:@"authorizationCode"];

                }

      }
}];
注意:
- account (首次授权时传入用户账号,openId传nil)
- openId (二次授权时传入,同时传入account和openId)
第二步:开发者调用第三方云服务接口传递第一步获取的授权码,然后第三方服务通过云对接方式调用C-Life云端接口获取随机码给客户端。
第三步:SDK请求C-Life验证验证码和随机码
【示例代码】
[[HETThirdCloudAuthorize shareInstance]autoAuthorizeWithRandomCode:_randomCode
verificationCode:verifyCode withCompleted:^(NSString *openId, NSError *error)
{
     NSLog(@"openId: %@", openId);
     if(error){

      }else
          if (openId) {
              self.openID = openId;
           }
}];
注意:
- randomCode 【必须】 随机码
- verificationCode 验证码(用户第一次授权需要用到验证码,不提交则默认为二次授权)
2.4 退出登录
【示例代码】
// 在授权登录成功的情况才执行操作
if ([self.auth isAuthenticated]) {
   [self.auth unauthorize];
}
2.5 获取用户信息
【示例代码】
typeof(self) __weak weakSelf = self;
[HETAuthorize getUserInformationSuccess:^(id responseObject) {
    OPLog(@"responseObject = %@",responseObject);
} failure:^(NSError *error) {
    OPLog(@"error = %@",error);
}];
接口返回的结果数据:
{
 "code":0,
 "data":{
    "userId": "d09f572c60ffced144d6cfc55a6881b9",
    "userName": "葫芦娃",
    "email":"",
    "phone":"",
    "sex": 1,
    "birthday": "2014-12-31",
    "weight": 48000,
    "height": 163,
    "avatar": "",
    "city": "深圳"
 }
}
接口数据说明:

2.6 异地登录通知
开放平台的账号只能在一台手机设备上面登录,当有账号在另一台手机设备登录时,SDK会抛出一个HETLoginOffNotification消息,开发者 必须 监听这个消息,处理异地登录的逻辑。 例:
【示例代码】
[[NSNotificationCenter defaultCenter] addObserver:self selector:@selector(XXX) name:HETLoginOffNotification object: nil];
2.7 修改密码
【示例代码】
HETAuthorize  *auth = [[HETAuthorize alloc]init];
typeof(self) __weak weakSelf = self;
[auth changePasswordSuccess:^(id responseObject) {
    OPLog(@"responseObject = %@",responseObject);
} failure:^(NSError *error) {
    OPLog(@"error = %@",error);
}];


3.设备绑定
3.1 绑定概述
3.1.1 绑定流程

3.1.2 设备分类
从设备层级上分为 设备大类 和 设备小类。例如,冰箱是大类,冰箱下有C-Life智能冰箱,即小类。
从设备类型上分为 蓝牙设备 和 WiFi设备,当我们拿到 设备的信息 的时候,就能区别设备是WiFi设备还是蓝牙设备。
WiFi设备绑定方式为 smartLink绑定 或者 AP绑定;蓝牙设备绑定方式为 蓝牙绑定。
smartLink 、AP和蓝牙绑定都是根据 moduleType 来区分,如下图所示:
| moduleType | 绑定类型 |
|---|---|
| 1 | WiFi设备 SmartLink绑定 |
| 2 | 蓝牙设备 |
| 9 | WiFi设备 AP绑定 |
蓝牙设备暂时只有一种绑定方式(蓝牙绑定)
3.2 获取设备信息
3.2.1 二维码获取设备信息
二维码命名规则:
http://open.clife.net/v1/web/open/product?param={"a":产品id}
第一步:获取产品ID
扫一扫内容:
urlStr: http://open.clife.net/v1/web/open/product?param={"a":3531}
"a":3531 3531 即是 产品ID
第二步:根据产品ID获取设备信息,区分设备绑定类型
【示例代码】
typeof(self) __weak weakSelf = self;
[HETDeviceRequestBusiness fetchDeviceInfoWithProductId:productId success:^(id responseObject) {
    // 获取设备信息
    if ([[responseObject allKeys] containsObject:@"data"]) {
         NSDictionary *dataDict = [responseObject valueForKey:@"data"];
       // 根据moduleType 区分设备绑定类型
       HETDevice *device = [HETDevice mj_objectWithKeyValues:dataDict];
       // WiFi绑定
       if ([device.moduleType integerValue] == 1
       || [device.moduleType integerValue] == 9)
       {
          // 需要填写跳转界面逻辑
          return;
       }
       // 蓝牙绑定
       if ([device.moduleType integerValue] == 2)
       {
          // 需要填写跳转界面逻辑
         return;
       }
  }
} failure:^(NSError *error) {
    NSInteger code = [[error.userInfo valueForKey:@"code"] integerValue];
    if (code == 100022013) {
      // msg=appId与产品未做关联
    }else{
      [HETCommonHelp showHudAutoHidenWithMessage:// 填写后台错误信息];
    }
}];

到此,在上图中已经获取到 productId、moduleType、deviceTypeId、deviceSubTypeId 可以进行设备绑定。
3.2.2 大类小类获取设备信息
第一步:获取设备大类列表
【示例代码】
在 **HETDeviceRequestBusiness** 查询相关接口
typeof(self) __weak weakSelf = self;
[HETDeviceRequestBusiness fetchDeviceTypeListSuccess:^(id responseObject)
{
    OPLog(@"responseObject = %@",responseObject);
} failure:^(NSError *error) {
    OPLog(@"error = %@",error);
}];

第二步:通过大类ID,获取设备小类
【示例代码】
// deviceTypeId 从上图获取得到
NSString *deviceTypeId = [NSString stringWithFormat:@"%@",deviceTypeId];
[HETDeviceRequestBusiness fetchDeviceProductListWithDeviceTypeId:deviceTypeId success:^(id responseObject) {
    OPLog(@"responseObject = %@",responseObject);
} failure:^(NSError *error) {
    OPLog(@"error = %@",error);
}];


到此,在上图中已经获取到 productId、moduleType、deviceTypeId、deviceSubTypeId 可以进行设备绑定。
3.3 WiFi设备绑定
3.3.1 smartLink绑定
在开始配置前,设备要先进入配置模式,然后App发送要配置的路由器ssid和密码,开启扫描设备服务将扫描到的设备进行绑定,获取绑定结果。
第一步:连接路由器热点

第二步:获取路由器ssid
【示例代码】
NSString *macAddr = [[HETWIFIBindBusiness sharedInstance] fetchmacSSIDInfo];
第三步:传入参数产品ID productId,路由器ssid 和 密码,启动绑定流程
【示例代码】
typeof(self) __weak weakSelf = self;
NSString *productId = [NSString stringWithFormat:@"%@",self.device.productId];
[[HETWIFIBindBusiness sharedInstance]
startSmartLinkBindDeviceWithProductId:productId
                             withSSID:self.ssid withPassWord:self.password withTimeOut:timeOut
                          bindHandler:^(HETWiFiDeviceBindState state, HETDevice *deviceObj, NSError *error) {
    OPLog(@"HETWiFiDeviceBindState: %ld", state);

    if (error) {
          // 扫描失败
    }else{
          // 扫描成功
    }
}];
3.3.2 AP绑定
在开始配置前,设备进入配置模式后,会产生一个WiFi热点。手机连接设备热点,将发送要配置的路由器ssid和密码给设备,然后App将配置信息给设备,之后设备自行于服务器绑定,App想服务器查询绑定状态。
使用C-Life提供的模组固件,设备产生的WiFi热点以“HET-xxx”开头,没有密码。其他厂商提供的模组,SoftAP热点名称由各自厂商指定。
第一步:连接路由器热点
第二步:获取路由器ssid 【示例代码】
NSString *macAddr = [[HETWIFIBindBusiness sharedInstance] fetchmacSSIDInfo];
第三步:手机切换设备热点

设备AP热点命名规则: radiocastName_deviceTypeId_deviceSubtypeId
当判断用户已经成功连接设备AP热点,即可进入绑定流程。
第四步:传入参数 产品ID productId、设备大类ID、设备小类ID、路由器ssid 和 密码,启动绑定流程
【示例代码】
NSString *productId = [NSString stringWithFormat:@"%@",self.device.productId];
NSString *typeId = [NSString stringWithFormat:@"%@",self.device.deviceTypeId];
NSString *subTypeId = [NSString stringWithFormat:@"%@",self.device.deviceSubtypeId];

typeof(self) __weak weakSelf = self;
[[HETWIFIBindBusiness sharedInstance] startAPBindDeviceWithProductId:productId
                                            withDeviceTypeId:typeId
                                                 withDeviceSubtypeId:subTypeId
                                withSSID:self.ssid
                              withPassWord:self.password
                              withTimeOut:timeOut
  bindHandler:^(HETWiFiDeviceBindState state, HETDevice *deviceObj, NSError *error) {
        OPLog(@"HETWiFiDeviceBindState: %ld", state);
        if (error) {
          // 绑定失败
        }else{
          // 绑定成功
        }
}];
注意: 绑定成功的回调中,需要发送一个绑定成功的通知,让首页设备列表刷新
3.4 蓝牙设备绑定
第一步:传入参数 产品ID productId、设备大类ID、设备小类ID,初始化 HETBLEBusiness对象
【示例代码】
//初始化蓝牙设备的业务类,需要设备的productId,deviceTypeId,deviceSubtypeId
self.bleBusiness = [[HETBLEBusiness alloc]initWithProductId:self.productId.integerValue
deviceTypeId:self.deviceTypeId.integerValue
deviceSubtypeId:self.deviceSubtypeId.integerValue];
第二步 蓝牙扫描设备
开始扫描蓝牙设备,扫描到的蓝牙设备,用tableView显示出来,给用户选择。
【示例代码】
typeof(self) __weak weakSelf = self;
[self.bleBusiness scanForPeripheralsWithTimeOut:timeOut name:nil mac:nil scanForPeripheralsBlock:^(NSArray<CBPeripheral *> *peripherals, NSError *error) {
  if (error) {
   // 停止扫描
   return;
  }
if (peripherals) {
  // 返回一个设备数组
  [peripherals enumerateObjectsUsingBlock:^(id _Nonnull obj, NSUInteger idx, BOOL * _Nonnull stop) {
  // 过滤重复的设备,并且刷新蓝牙设备列表
  }];
  return;
  }
}];
第二步:选择需要绑定的设备,启动绑定流程
【示例代码】
typeof(self) __weak weakSelf = self;
[self.bleBusiness bindBleDeviceWithPeripheral:cbp macAddress:nil completionHandler:^(NSString *deviceId, NSError *error) {
  [weakself.bleBusiness disconnectWithPeripheral:cbp];
  if(error) {
    // 填写绑定失败的代码
  }
  else
  {
    // 填写绑定成功的代码
  }
}];
注意: 在绑定成功的回调中,需要发送一个绑定成功的通知,让首页设备列表刷新
4.设备控制
4.1 WIFI设备控制
参考HETDeviceControlBusiness类里面方法,实现设备控制和运行状态的监听
参考HETDeviceRequestBusiness类里面的方法,获取设备的信息。
第一步:获取已绑定的设备列表,获取设备信息(HETDevice)(绑定成功后,用户可以获取绑定成功的设备列表,获取到设备列表拿到设备的HETDevice设备信息才可以控制设备)
【示例代码】
typeof(self) __weak weakSelf = self;
[HETDeviceRequestBusiness fetchAllBindDeviceSuccess:^(NSArray<HETDevice *> *deviceArray) {
    OPLog(@"responseObject ==%@",deviceArray);
} failure:^(NSError *error) {
    OPLog(@"error ==%@",error);
}];

第二步:根据获取的设备信息,监听设备状态
初始化HETDeviceControlBusiness的实例对象,传递需要监听的设备信息作为参数,监听block的回调信息,做相应的业务逻辑。对于运行数据、控制数据、错误数据的内容,请参考具体设备的配置协议内容。
【示例代码】
- (HETDeviceControlBusiness *)controlBusiness
{
    if (!_controlBusiness) {
        typeof(self) __weak weakSelf = self;
        _controlBusiness = [[HETDeviceControlBusiness alloc]initWithHetDeviceModel:self.device deviceRunData:^(id responseObject) {
            // 监听设备运行数据,responseObject请具体参考协议配置。
            OPLog(@"deviceRunData:%@ " ,responseObject);

        } deviceCfgData:^(id responseObject) {
                // 监听设备控制数据
            OPLog(@"deviceCfgData:%@ " ,responseObject);

        } deviceErrorData:^(id responseObject) {
            // 监听设备错误数据
            OPLog(@"deviceErrorData:%@ " ,responseObject);

        } deviceState:^(HETWiFiDeviceState state) {
            // 监听设备在线状态数据
            OPLog(@"deviceState:%ld " ,(long)state);
        }];
    }
    return _controlBusiness;
}
第三步:启动监听服务
【示例代码】
- (void)viewWillAppear:(BOOL)animated
{
    [super viewWillAppear:animated];
    [self.controlBusiness start];
}
第四步:停止监听服务
【示例代码】
- (void)viewWillDisappear:(BOOL)animated
{
    [super viewWillDisappear:animated];
    [self.controlBusiness stop];
}
第五步:下发控制数据
【示例代码】
- (void)configDataSetWithColorTemp:(NSDictionary *)dict{

    NSData * jsonData = [NSJSONSerialization dataWithJSONObject:dict options:NSJSONWritingPrettyPrinted error:nil];
    NSString * jsonStr = [[NSString alloc] initWithData:jsonData encoding:NSUTF8StringEncoding];

    typeof(self) __weak weakSelf = self;
    [self.controlBusiness deviceControlRequestWithJson: jsonStr withSuccessBlock:^(id responseObject) {
        OPLog(@"responseObject = %@",responseObject);

    } withFailBlock:^(NSError *error) {
        OPLog(@"error = %@",error);
    }];
}
关于updateflag:
关于updateflag
这个修改标记位是为了做统计和配置下发的时候设备执行相应的功能。下发数据必须传递updateflag标志
例如,空气净化器(广磊K180)配置信息协议:
紫外线(1)、负离子(2)、臭氧(3)、儿童锁(4)、开关(5)、WiFi(6)、过滤网(7)、模式(8)、定时(9)、风量(10) 上面一共上10个功能,那么updateFlag就2个字节,没超过8个功能为1个字节,超过8个为2个字节,超过16个为3个字节,以此类推。
打开负离子,2个字节,每一个bit的值为下:
0 0 0 0 0 0 0 0 0 0 0 0 0 0 1 0
4.2 蓝牙设备控制
蓝牙设备控制,参考HETBLEBusiness类里面的方法和实现。
第一步、获取已绑定的设备列表,从中获取某个设备信息 HETDevice。
【示例代码】
typeof(self) __weak weakSelf = self;
[HETDeviceRequestBusiness fetchAllBindDeviceSuccess:^(NSArray<HETDevice *> *deviceArray) {
    OPLog(@"responseObject ==%@",deviceArray);
} failure:^(NSError *error) {
    OPLog(@"error ==%@",error);
}];
第二步:初始化
【示例代码】
- (void)setDevice:(HETDevice *)device
{
    _device = device;
    // 设备控制需要的设备信息
    _macAddress = device.macAddress;
    _deviceType = device.deviceTypeId.integerValue;
    _deviceSubType = device.deviceSubtypeId.integerValue;
    _productId = device.productId.integerValue;
    _deviceId = device.deviceId;
}

-(void)viewWillAppear:(BOOL)animated
{
    [super viewWillAppear:animated];

    if(!_bleBusiness)
    {
        _bleBusiness=[[[HETBLEBusiness alloc]init]initWithProductId:self.productId
         deviceTypeId:self.deviceType deviceSubtypeId:self.deviceSubType];

    }
}
第三步:监听设备状态
【示例代码】
typeof(self) __weak weakSelf = self;
[_bleBusiness fetchStatusDataWithPeripheral:self.blePeripheral
macAddress:self.macAddress deviceId:self.deviceId
completionHandler:^(CBPeripheral *currentPeripheral,NSDictionary *dic, NSError *error) {
    typeof(weakSelf) __strong strongSelf = weakSelf;
    strongSelf.blePeripheral=currentPeripheral;
    OPLog(@"状态数据:%@,%@",dic,error);
    if(dic)
    {
        uint8_t state ;
        UInt8 color;
        NSString *colorStr=dic[@"LED"];
        NSString *stateStr=dic[@"LIGHT"];
        color=colorStr.intValue;//@"MIST":@"0",@"LIGHT":@"1",@"LED"
        state=stateStr.intValue;
        strongSelf->ledColor = color%9;
        strongSelf->ledState = state;
        if (state == 3) {
            [strongSelf changeLED_color:0];//灯是关掉的
        }else if(state == 1) {
            [strongSelf changeLED_color:color];
        }
    }
}];
第四步:控制设备
【示例代码】
typeof(self) __weak weakSelf = self;
[_bleBusiness deviceControlRequestWithPeripheral:self.blePeripheral
macAddress:self.macAddress
sendDic:@{@"LED":@(ledColor %9)}
completionHandler:^(CBPeripheral *currentPeripheral,NSError *error) {
    typeof(weakSelf) __strong strongSelf = weakSelf;
    strongSelf.blePeripheral=currentPeripheral;
    OPLog(@"数据发送回调:%@",error);
}];
5.设备管理
5.1 获取设备列表
【示例代码】
typeof(self) __weak weakSelf = self;
[HETDeviceRequestBusiness fetchAllBindDeviceSuccess:^(NSArray<HETDevice *> *deviceArray) {

} failure:^(NSError *error) {

}];
5.2 解绑设备
设备删除有2中情况,需要自己根据设备分享类型(device.share)来区分:
第一种:设备是用户自己绑定的设备。调用HETDeviceRequestBusiness提供的方法来解除绑定关系。
【示例代码】
typeof(self) __weak weakSelf = self;
[HETDeviceRequestBusiness unbindDeviceWithDeviceId:device.deviceId success:^(id responseObject) {
    OPLog(@"responseObject ==%@",responseObject);
} failure:^(NSError *error) {
    OPLog(@"error ==%@",error);
}];
第二种:设备是别人分享的过来的设备。调用HETDeviceShareBusiness 提供的方法来解绑分享关系。
【示例代码】
[HETDeviceShareBusiness deviceAuthDelWithDeviceId:device.deviceId userId:@"" success:^(id responseObject) {
    OPLog(@"responseObject ==%@",responseObject);
} failure:^(NSError *error) {
    OPLog(@"error ==%@",error);
}];
5.3 设备分享
5.3.1 设备分享方式分类
1、面对面分享:
A用户打开App设备面对面分享产生一个分享二维码, B用户打开App的扫一扫,直接获取设备的控制权限。
2、第三方社交分享:
A用户打开App设备第三方应用分享(微信,QQ),例如分享到微信好友, B用户识别微信中的二维码,打开分享网页,尝试打开App成功即获取设备的控制权限,失败就提示用户B下载App。
注意:
1、URL scheme
- 第三方分享需要App提供URL scheme,方便web页面打开App,并且传递分享码给App。
2、分享码有效期
- 面对面分享码有效期为10分钟
- 第三方分享码有效期为一个小时
5.3.2 设备分享流程
1、面对面分享:
第一步:A用户请求分享码,并生成分享二维码
【示例代码】
- (void)getShareCode{
    typeof(self) __weak weakSelf = self;
    [HETDeviceShareBusiness getShareCodeWithDeviceId:self.deviceId shareType:HETDeviceShareType_FaceToFaceShare success:^(id responseObject) {
        OPLog(@"responseObject == %@",responseObject);
        NSString *shareCode = [responseObject valueForKey:@"shareCode"];
        [weakSelf setupGenerateQRCode:shareCode];
    } failure:^(NSError *error) {
        OPLog(@"error == %@",error);
        [HETCommonHelp showHudAutoHidenWithMessage:[error.userInfo valueForKey:@"NSLocalizedDescription"]];
    }];
}
参数说明
| 参数名称 | 是否必须 | 字段类型 | 参数说明 |
|---|---|---|---|
| deviceId | 是 | NSString | 设备ID |
| shareType | 是 | HETDeviceShareType | 分享类型 (5:面对面分享 6:第三方社交平台分享) |
生成二维码:
【示例代码】
// 生成二维码
- (void)setupGenerateQRCode:(NSString *)shareCode{
    NSString *code = [NSString stringWithFormat:@"shareCode = %@",shareCode];
    // 将CIImage转换成UIImage,并放大显示
    self.codeImageView.image = [SGQRCodeGenerateManager generateWithDefaultQRCodeData:code imageViewWidth:300];
}
第二步:对方用App扫描分享码,获取设备权限
App扫描二维码获取设备权限
【示例代码】
typeof(self) __weak weakSelf = self;
[HETDeviceShareBusiness authShareDeviceWithShareCode:shareCode shareType:HETDeviceShareType_FaceToFaceShare success:^(id responseObject) {
    OPLog(@"responseObject ==%@",responseObject);
} failure:^(NSError *error) {
    OPLog(@"error ==%@",error);
}];
2、第三方应用分享:
第一步:A用户请求分享连接
【示例代码】
typeof(self) __weak weakSelf = self;
[HETDeviceShareBusiness getShareCodeWithDeviceId:self.deviceId shareType:HETDeviceShareType_ThirthShare success:^(id responseObject) {
    OPLog(@"responseObject == %@",responseObject);
    NSString *h5Url = [responseObject valueForKey:@"h5Url"];
} failure:^(NSError *error) {
    OPLog(@"error == %@",error);
}];
第二步:B用户通过第三方应用打开连接,web页面尝试打开App
第三步:B用户的App验证分享码,获取设备权限
【示例代码】
- (BOOL)application:(UIApplication *)application openURL:(NSURL *)url sourceApplication:(NSString *)sourceApplication annotation:(id)annotation
{
    // 将URL转成字符串
    NSString *urlString = url.scheme;
    if ([urlString isEqualToString:@"hetopenplatform"]) {
        NSString *shareCode = [[url.host  componentsSeparatedByString:@"="] lastObject];
        [HETDeviceShareBusiness authShareDeviceWithShareCode:shareCode shareType:HETDeviceShareType_ThirthShare success:^(id responseObject) {
            OPLog(@"responseObject == %@",responseObject);
            [HETCommonHelp showHudAutoHidenWithMessage:@"获取设备权限成功"];
            [[NSNotificationCenter defaultCenter] postNotificationName:BindDeviceSuccess object:nil];

        } failure:^(NSError *error) {
            OPLog(@"error == %@",error);
            [HETCommonHelp showHudAutoHidenWithMessage:[error.userInfo valueForKey:@"NSLocalizedDescription"]];
        }];
        return YES;
    }else{
        BOOL result = [HETOpenSDK application:application openURL:url sourceApplication:sourceApplication annotation:annotation];
        return result;
    }
}
5.3.3 获取设备授权用户列表
【示例代码】
typeof(self) __weak weakSelf = self;
[HETDeviceShareBusiness deviceGetAuthUserWithDeviceId:self.deviceId success:^(id responseObject) {
    OPLog(@"responseObject == %@",responseObject);
} failure:^(NSError *error) {
    OPLog(@"error == %@",error);
}];
5.4 修改设备信息
修改设备信息,用户可以修改设备的名称
【示例代码】
NSString *deviceId=self.hetDeviceModel.deviceId;
[HETDeviceRequestBusiness updateDeviceInfoWithDeviceId:deviceId
 deviceName:@"123fsdg" roomId:@"12" success:^(id responseObject) {
     OPLog(@"responseObject = %@",responseObject);
 } failure:^(NSError *error) {
     OPLog(@"error = %@",error);
}];
6.其他接口
其他接口指业务性接口,如意见反馈、常见问题、隐私政策、版本声明 等
使用方法:用户选择对应的requestUrl作参数,调用sdk提供的通用接口
通用接口如下:
/**
 *  普通网络请求
 *
 *  @param method     HTTP网络请求方法
 *  @param requestUrl 网络请求的URL
 *  @param params     请求参数
 *  @param needSign   是否需要签名
 *  @param success    网络请求成功的回调
 *  @param failure    网络请求失败的回调
 */
+(void)startRequestWithHTTPMethod:(HETRequestMethod)method
                   withRequestUrl:(NSString *)requestUrl
                    processParams:(NSDictionary *)params
                         needSign:(BOOL)needSign
                 BlockWithSuccess:(successBlock)success
                          failure:(failureBlock)failure
requestUrl说明
| requestUrl | 参数说明 |
|---|---|
| /v1/feedback/addFeedback | 意见反馈 |
| 暂未开放 | 常见问题 |
| 暂未开放 | 隐私政策 |
| 暂未开放 | 版本声明 |
6.1 意见反馈
【示例代码】
typeof(self) __weak weakSelf = self;
[HETDeviceRequestBusiness startRequestWithHTTPMethod:HETRequestMethodPost withRequestUrl:@"/v1/feedback/addFeedback" processParams:params needSign:NO BlockWithSuccess:^(id responseObject) {
    OPLog(@"responseObject = %@",responseObject);
} failure:^(NSError *error) {
    OPLog(@"error = %@",error);
}];
7.全局返回码
全局返回码说明
每次调用接口时,可能获得正确或错误的返回码,可以根据返回码信息调试接口,排查错误。 全局返回码说明如下:
| 返回码 | 说明 |
|---|---|
| 0 | 请求成功 |
| 100010100 | 缺少授权信息 |
| 100010101 | AccessToken错误或已过期 |
| 100010102 | RefreshToken错误或已过期 |
| 100010103 | AppId不合法 |
| 100010104 | timestamp过期 |
| 100010105 | 签名错误 |
| 100010200 | 失败 |
| 100010201 | 缺少参数 |
| 100010202 | 参数错误 |
| 100010203 | 必须使用https |
| 100010208 | 产品不存在 |
| 100021000 | 帐号已注册 |
| 100021001 | 帐号未注册 |
| 100021007 | 帐号已邀请 |
| 100021008 | 邀请你的用户已解绑该设备 |
| 100021010 | 邀请已被接受 |
| 100021301 | 验证码错误 |
| 100021302 | 随机码错误 |
| 100021303 | 您的访问太过频繁,请15分钟之后再尝试 |
| 100021304 | 重新获取验证码成功 |
| 100021401 | 用户不存在 |
| 100021500 | 密码错误 |
| 100021603 | 数据不存在 |
| 100022000 | 设备不存在 |
| 100022001 | 设备未绑定 |
| 100022002 | 设备已绑定 |
| 100022003 | 设备解绑失败 |
| 100022004 | MAC地址已绑定另一种设备 |
| 100022005 | 设备控制JSON错误 |
| 100022006 | 设备不在线 |
| 10002208 | 不能邀请自己控制 |
| 100022011 | 设备已授权 |
| 100022012 | 待更换MAC与原MAC相同 |
| 100022013 | appId与产品未做关联 |
| 100022014 | 待绑定MAC未进行服务注册 |
| 106000021 | 应用无权限查看该设备信息 |
| 106000026 | 产品不存在 |
| 106000031 | 应用包名错误 |
| 106000036 | openId错误 |
| 106000037 | 手机号码错误 |
| 106000041 | 帐号错误,请使用开放平台账号登录 |
8.H5+Native混合框架
8.1 H5开放框架概述
为了适应App不断添加新的设备和动态更新,C-Life平台结合APP开发一套动态的插件更新框架。基于这套框架可以实现App功能的快速开发迭代,减少产品的上线周期。 H5设备控制,是指设备控制页面用html5开发,嵌入到原生App,实现设备控制页面动态更新的一种方式。
8.2 iOS App和H5通讯流程图
SDK提供了原生与H5通讯的管理接口HETWKWebViewJavascriptBridge,其通讯原理图如下:

8.3 H5设备控制集成流程
8.3.1 初始化
下载H5公共包
【示例代码】
- (BOOL)application:(UIApplication *)application didFinishLaunchingWithOptions:(NSDictionary *)launchOptions {

    [HETH5Manager launch];
    return YES;
}
选择H5界面设备
【示例代码】
- (void)tableView:(UITableView *)tableView didSelectRowAtIndexPath:(NSIndexPath *)indexPath {
    [tableView deselectRowAtIndexPath:indexPath animated:YES];

    HETDevice *device = self.deviceArr[indexPath.row];
    if([device.productId integerValue] == 1755)
    {
        [self PushTpH5Device:device];
    }
}
跳转H5VC
【示例代码】
#pragma mark - H5设备
- (void)PushTpH5Device:(HETDevice *)deviceModel
{
    HETH5ViewController *h5vc = [[HETH5ViewController alloc]init];
    h5vc.deviceModel=deviceModel;

    WEAKSELF
    [HETCommonHelp showCustomHudtitle:@"正在加载"];
    [[HETH5Manager shareInstance] getH5Path:^(NSString *h5Path,BOOL needRefresh,NSError *error) {
        OPLog(@"needRefresh == %@",@(needRefresh));
        OPLog(@"h5PagePath--->:%@",h5Path);
        [HETCommonHelp HidHud];
        if(error){
            NSLog(@"获取H5失败");
        }else{
            NSString *desPath  = [NSString stringWithFormat:@"%@/index.html",h5Path];
            h5vc.h5Path = desPath;
            if(needRefresh == YES){
                [h5vc.wkWebView reload];
            }else{
                [weakSelf.navigationController pushViewController:h5vc animated:YES];
            }
        }

    } productId:[NSString stringWithFormat:@"%@",deviceModel.productId]];
}
8.3.2 加载H5资源
1、创建webView,添加bridge
创建自己的webView,再创建webView和原生的通信bridge,同时需要实现
HETWKWebViewJavascriptBridgeDelegate相关代理
HETWKWebViewJavascriptBridge* bridge = [HETWKWebViewJavascriptBridge   bridgeForWebView:webView];
bridge.delegate=self;
[bridge setNavigationDelegate:self];
2、加载本地H5
- (void)loadRequest
{
    if (self.h5Path&&self.h5Path.length>0) {

        if ([self.h5Path hasPrefix:@"http"]) {

            [_wkWebView loadRequest:[NSURLRequest requestWithURL:[NSURL URLWithString:self.h5Path]]];
        }else{
            NSRange webRange = [_h5Path rangeOfString:@"web"];
            NSRange locationRange = [_h5Path rangeOfString:@"household"];
            NSString *directory;
            if (webRange.length>0) {
                directory = [_h5Path substringWithRange:NSMakeRange(0, webRange.length+webRange.location+1)];
            }
            if (locationRange.length>0) {
                directory = [_h5Path substringWithRange:NSMakeRange(0, locationRange.length+locationRange.location+1)];
            }

            if (NSFoundationVersionNumber>NSFoundationVersionNumber_iOS_8_x_Max) {
                @try {
                    [_wkWebView loadFileURL:[NSURL URLWithString:[NSString stringWithFormat:@"file://%@",[self.h5Path stringByAddingPercentEscapesUsingEncoding:NSUTF8StringEncoding]]] allowingReadAccessToURL:[NSURL fileURLWithPath:directory]];
                } @catch (NSException *exception) {
                    OPLog(@"%@",exception);
                } @finally {

                }
            }else{
                [_wkWebView loadRequest:[NSURLRequest requestWithURL:[NSURL URLWithString:[NSString stringWithFormat:@"file://%@",[self.h5Path  stringByAddingPercentEscapesUsingEncoding:NSUTF8StringEncoding]]]]];
            }
        }
    }
}

- (void)updateWebOrientation {
    UIInterfaceOrientation orientation = [UIApplication sharedApplication].statusBarOrientation;
    if (UIInterfaceOrientationIsLandscape(orientation)) {
        //[_webView stringByEvaluatingJavaScriptFromString:
        // @"document.body.setAttribute('orientation', 90);"];
        [_wkWebView evaluateJavaScript:@"document.body.setAttribute('orientation', 90);" completionHandler:nil];
    } else {
        //[_webView stringByEvaluatingJavaScriptFromString:
        // @"document.body.removeAttribute('orientation');"];
        [_wkWebView evaluateJavaScript:@"document.body.removeAttribute('orientation');" completionHandler:nil];
    }
}
3、监听设备数据,通过bridge传递给H5
_communicationManager=[[HETDeviceControlBusiness alloc]initWithHetDeviceModel:self.deviceModel deviceRunData:^(id responseObject) {
        [_bridge webViewRunDataRepaint:responseObject];
    } deviceCfgData:^(id responseObject) {
        [_bridge webViewConfigDataRepaint:responseObject];
    } deviceErrorData:^(id responseObject) {
        [_bridge webViewRunDataRepaint:responseObject];
    } deviceState:^(HETWiFiDeviceState state) {
        NSMutableDictionary *infoDic = [NSMutableDictionary dictionary];
        [infoDic setObject:@(state) forKey:@"onlineStatus"];
        [_bridge webViewRunDataRepaint:infoDic];

    } failBlock:^(NSError *error) {
        NSLog(@"失败了:%@",error);
}];

[_communicationManager start];
4、实现HETWKWebViewJavascriptBridgeDelegate,接受H5传递过来的参数
#pragma -mark HETWKWebViewJavascriptBridgeDelegate
/**
 *  js调用的配置接口
 *
 *  @param data
 */
-(void)config:(id)data
{
    [_bridge webViewReady:nil];
    if(self.communicationManager.deviceCfgData)
    {
        [_bridge webViewConfigDataRepaint:self.communicationManager.deviceCfgData];
    }
}


/**
 *  js调用的发送数据接口
 *
 *  @param data 将发送给App的数据,一般是完整的控制数据(json字符串)
 *  @param successCallback  App方数据处理成功时将调用该方法
 *  @param errorCallback    App方数据处理失败时将调用该方法
 */
-(void)send:(id)data successCallback:(id)successCallback errorCallback:(id)errorCallback
{
    //[_bridge updateDataSuccess:nil successCallBlock:successCallback];
    NSData *jsonData = [data dataUsingEncoding:NSUTF8StringEncoding];
    NSDictionary *olddic = [NSJSONSerialization JSONObjectWithData:jsonData options:0 error:nil];
    NSMutableDictionary *responseObject=[[NSMutableDictionary alloc]initWithDictionary:olddic];
    NSMutableDictionary *dic = [[NSMutableDictionary alloc] init];
    dic=responseObject;
    NSError * err;
    NSData * tempjsonData = [NSJSONSerialization dataWithJSONObject:dic options:NSJSONWritingPrettyPrinted error:&err];
    NSString * json = [[NSString alloc] initWithData:tempjsonData encoding:NSUTF8StringEncoding];
    [self.communicationManager deviceControlRequestWithJson:json withSuccessBlock:^(id responseObject) {
        [_bridge updateDataSuccess:responseObject successCallBlock:successCallback];
    } withFailBlock:^(NSError *error) {
        [_bridge updateDataError:responseObject errorCallBlock:errorCallback];
    }];


}


/**
 *  js调用的设置页面标题接口(该方法用于将标题发送给App,以供App进行标题更新。)
 *
 *  @param data  将设置的标题
 */
-(void)title:(id)data
{
    self.title=data;
}


/**
 *  js调用的系统toast接口(方法用于调用系统toast,以便App方统一toast风格)
 *
 *  @param data 将要弹出的提示信息
 */
-(void)toast:(id)data
{

}

/**
 *  H5调用config接口后需要App调用此方法,告知js准备好了(注意此方法调用之后,一般需要紧接着调用webViewConfigDataRepaint传配置数据给H5初始化界面)
 *
 *  @param dic
 */
-(void)relProxyHttp:(id)url data:(id)data httpType:(id) type sucCallbackId:(id) sucCallbackId errCallbackId:(id) errCallbackId needSign:(id) needSign
{

}

/**
 *  H5调用config接口后需要App调用此方法,告知js准备好了(注意此方法调用之后,一般需要紧接着调用webViewConfigDataRepaint传配置数据给H5初始化界面)
 *
 *  @param dic
 */
-(void)absProxyHttp:(id)url data:(id)data httpType:(id) type sucCallbackId:(id) sucCallbackId errCallbackId:(id) errCallbackId
{

}

/**
 *  加载H5页面失败
 *
 *  @param errCode  错误码
 *  @param errMsg   错误信息
 */
-(void)onLoadH5Failed:(id)errCode errMsg:(id)errMsg
{

}

/**
 *  H5调用config接口后需要App调用此方法,告知js准备好了(注意此方法调用之后,一般需要紧接着调用webViewConfigDataRepaint传配置数据给H5初始化界面)
 *
 *  @param dic
 */
-(void)h5SendDataToNative:(id) routeUrl data:(id) data successCallbackId:(id)successCallbackId failedCallbackId:(id) failedCallbackId
{
    [_bridge webViewNativeResponse:@{@"h5SendDataToNative":routeUrl} callBackId:successCallbackId];
}

/**
 *  H5调用config接口后需要App调用此方法,告知js准备好了(注意此方法调用之后,一般需要紧接着调用webViewConfigDataRepaint传配置数据给H5初始化界面)
 *
 *  @param dic
 */
-(void)h5GetDataFromNative:(id)routeUrl successCallbackId:(id)successCallbackId failedCallbackId:(id)failedCallbackId
{
    [_bridge webViewNativeResponse:@{@"h5GetDataFromNative":routeUrl} callBackId:successCallbackId];
}
9.补充说明
9.1 第三方社交平台登录
目前第三方社交平台支持 微信、QQ、微博
【示例代码】
[self.auth authorizeWithCompleted:^(NSString *openId, NSError *error) {
    if(!error)
    {
        // 授权登录成功
    }
    else
   {
        // 授权登录失败
    }
}];
9.2 配置第三方社交平台
9.2.1 集成准备
pod 'WechatOpenSDK', '1.7.7'
pod 'WeiboSDK', '3.1.3'
pod 'TencentOpenApiSDK', '2.9.5'
9.2.2 初始化
【示例代码】
- (BOOL)application:(UIApplication *)application didFinishLaunchingWithOptions:(NSDictionary *)launchOptions {
    [HETOpenSDK setPlaform:HETAuthPlatformType_QQ appKey:XXX appSecret:nil redirectURL:nil];
    [HETOpenSDK setPlaform:HETAuthPlatformType_Weibo appKey:XXX appSecret:nil redirectURL:@"XXX"];
    [HETOpenSDK setPlaform:HETAuthPlatformType_Wechat appKey:XXX appSecret:XXX redirectURL:nil];
    return YES;
}